Showing posts with label Portfolio Dress Sew Along. Show all posts

Thursday, May 26, 2011

Portfolio Dress Features

Chris and I had such a great time co-hosting the Portfolio Dress Sew Along back at the end of April. I think one of the best parts was knowing that people actually did sew along with us (yay!) and seeing all of the different version of the same pattern. I've been promising to feature these dresses for a while. I have four dresses to feature today, and here they are...

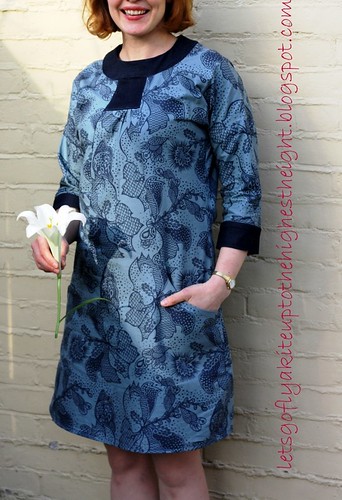
I love this version that KJ from let's go fly a kite made. The denim contrast was a perfect choice. She even made fabric-covered buttons.

Portfolio Dress

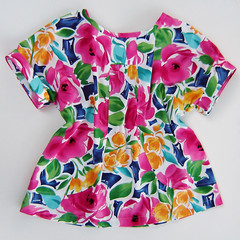
Marci Girl Designs made two versions in a tunic length. Her muslin (left) is adorable. Her second version (right) is so bright and fun. She skipped the wide neckline on this version. It's interesting how a small change can make such a big difference.

Lisette Portfolio TunicLisette Portfolio Tunic Floral

Leah from Sew Spoiled gets the award for bravery because she used a plaid! If you aren't familiar with sewing, plaid can be very difficult to work with because you need to make sure that the lines of the fabric match up when you sew each piece together. Her dress is fantastic!

Porfolio Dress (1)

Thanks to everyone who sewed along. I know there are people still working on their dresses (and several who cut everything out and never got around to sewing it togther :) When you finish, please add some pictures to the Flickr pool... we would love to see them!


By the way, have you entered my birthday week giveaway yet? It ends tomorrow, May 27th at 11:59pm (EST).

Friday, May 6, 2011

Blogkeeping: Portfolio Dresses and Pinterest

Chris and I are delaying sharing your Portfolio dresses in order to allow people a little more time to finish. Please add your dress to the Flickr pool, and we will feature your dresses a week from today, Friday, May 13th.

I've been taking a little blogging break this week. The sew along last week was exhausting. I was near the edge of blog burnout, so the rest has been good because I am coming back from the brink :) I just needed a little sleep and a little time away from the computer. Posting will probably be light again next week as I prepare for the birthday event the following week. I've been having fun creating some things behind the scenes that you'll get to see during the event. Can't wait!

Changing gears a little... Have you heard of Pinterest? It's only the best thing since sliced bread. Seriously. Pinterest is a place to "pin" your bookmarks so you have a visual reminder of what they are, not just a list of text links. This is the official Pinterest description of itself, "Think of Pinterest as a virtual pinboard — a place where you can create collections of things you love and "follow" collections created by people with great taste." I am not on Facebook and I don't know a Tweet from a hole in the wall, but I can't get enough of Pinterest. It's dangerous. The first night I got on I was up until 3am. If you're interested in checking out my pins, click HERE. There's also a link in my sidebar. If you are interested in staying up all night joining Pinterest, you may need an invitation because it is still in beta mode. Send me an email, and I'll hook you up. (Thanks, Caroline, for my invite!)


Finally, I want to thank Alana (a.k.a. Mrs. Taylor) from Taylor Made Home for passing the Kreativ Blogger Award on to me. Thanks, Alana!

Have a Happy Mother's Day!

Friday, April 29, 2011

Portfolio Dress Sew Along: Day 5

Welcome to the 5th and final day of the Portfolio Dress Sew Along hosted by Gwenny Penny and Pickup Some Creativity!


Today Chris and I will be sharing our finished dresses and some additional tips and tricks we learned along the way. If you are just joining us, click here for Day 1, here for Day 2, here for Day 3, and here for Day 4 of the sew along.

Time to share my finished dress with you. I'm not much of a model, and I hate having my picture taken. We have very few pictures of me because I'm usually the one behind the camera. I've been nervous about having to pose for the final product, but here goes nothing...


This is my favorite picture (probably because you can't see me :)...


I'm pleasantly surprised with this dress. I love the pockets, and the cotton lawn Lisette fabric is so light and airy and comfortable.


OK, enough about me, let's move on to...

Portfolio Dress Pattern Tips and Tricks:
  • A sewing gauge is really helpful, not just for this project but for any sewing project.
  • I use a water soluble disappearing ink pen for my pattern markings. When I'm done with the marks, I just use a damp washcloth to wipe the ink off the fabric. My pen is bright pink so it really stands out against the fabric.
  • Don't be afraid to use lots of pins. No one will think any less of you for using 50 pins to attach your sleeve or neck band. Pinning gives me confidence when I'm sewing.
  • I could not get the button loops to turn using the method described in the pattern. I used Chris's idea instead. It was much easier and still looks great.
  • I had difficulty with two parts of the pattern. The first was Step 9, attaching the side front and pocket (piece 3) to the pocket facing and front (pieces 4 and 1). My problem was with the pinning. I originally pinned all three pieces 1, 3, and 4 together. You actually need to pin pieces 1 and 3 together until you come down to the pockets, then pin pieces 3 and 4 together without piece 1. The second difficult part for me was Step 28, attaching the neck band to the garment. It took me about five tries to get everything to line up, which meant removing my 800 pins every time I started over, but I'm glad I took the time to get it right. Make sure you clip the neckline of the garment and attach the neck band at the staystitching.
  • Pay attention to changes in stitch length. When you go from regular stitching to basting or gathering then back to regular stitching, it's easy to forget to change the stitch length on your machine between steps. The same goes for changing thread colors when switching from working on the main fabric to the contrast fabric and back.
Thanks so much to everyone who participated or just read along this week. I learned so much over the past five days, not only about sewing and patterns but also about blogging and sew alongs. Make sure you check out our Flickr group. I can't wait to see how everyone's dresses turned out! Chris and I will be featuring dresses next Friday, May 6th, so you have another week to finish up and add your dresses to the Flickr group. If you don't have a Flickr account, please feel free to email me a picture of your dress so I can add it to the feature post. We'd like to include everyone!

A special thank you to Chris for being my partner in crime on this project. I wouldn't have gotten through this without you :)

Thursday, April 28, 2011

Portfolio Dress Sew Along: Day 4

Welcome to Day 4 of the Portfolio Dress Sew Along hosted by Gwenny Penny and Pickup Some Creativity!


If you are just joining us, click here for Day 1, here for Day 2, and here for Day 3. We would love for you to join our Flickr group so you can share your dress with everyone. Today you'll start over at Pickup Some Creativity for Steps 24 and 28 through 31 with Chris. Then come back over here to finish your dress (hooray!) with me on Steps 32 and 33.

Step 32: "On OUTSIDE, sew buttons to RIGHT back neck band opposite loops."

To figure out exactly where I needed to sew my buttons, I lined up my back neck band pieces, with the button loops overlapping the right side. I made sure the back neck band pieces themselves were not overlapping and then pinned the button loops in place.


I took my water soluble disappearing ink pen and marked a dot on the right back neck band right in the center of each button loop. I then sewed my buttons onto the right back neck band, centering each button on the dots.


The pattern calls for 3/8" diameter buttons, but I used 1/2" buttons, and they work perfectly.


Step 33: "Mark length. Press up hem along marking. Mark depth of hem; trim evenly. To EDGE FINISH the raw edge... stitch under 1/4", zig-zag, OR overlock/serge. Slip-stitch or machine-stitch hem in place, easing in fullness."

This is how I determined whether or not my hem was even... I hung the dress on a hanger and hung the hanger on the wall. I grabbed a yardstick and measured from the floor up to the bottom of my dress at several different locations to make sure that the bottom of my dress was even before I started hemming.


The bottom of my dress was even, but if yours is not you will need to trim it so that it is even. You can use this same method to mark where you would like your hemline to fall, then press the hem to the wrong side of the fabric along this marking. Technically the hemline should be marked while you are wearing the dress, but a lot of times that just is not possible. I'm pretty sure I wouldn't ask my husband to pin the hem of my dress for me :)

The pattern directions recommend that you start by finishing the raw bottom edge by stitching the bottom edge up 1/4" or zig-zag stitching the bottom edge or overlock stitching/serging the bottom edge. After finishing the edge using one of these methods, the directions call for either slip-stitching or machine-stitching the hem in its final position. There are several methods for hemming a dress or skirt. You may want to check out this post on general Tips and Techniques for Hems from Sew, Mama, Sew.

I used a different method than that shown in the pattern... This tool is a sewing and knitting gauge, and it is one of the most useful sewing tools that I own. If you don't have one, just use a measuring tape or ruler.


The hem allowance on the pattern is 1 1/4". I went with 1" because the length before hemming seemed almost perfect to me. I didn't want to go much shorter. Using my sewing gauge to keep things even, I pressed the hem up 1" to the inside of the dress.


Next, I tucked the raw edge under to the fold and pressed again.


After pressing the hemline all the way around, I machine-stitched the hem about 3/8" from the bottom edge.


Here is the finished hem of my dress when it's hanging...


OK, drum roll please... Your dress is done!!! Try it on and take some pictures to share with the Flickr group.

Come back tomorrow to see the finished dresses that Chris and I made. We will also be sharing some tips and tricks that we learned along the way. And don't forget that Chris and I will be featuring your dresses next Friday, May 6th. As always, if you have any questions, tips, or comments, please leave them in the comments section below so that everyone can benefit from the discussion. Thanks for sewing along!
Wednesday, April 27, 2011

Portfolio Dress Sew Along: Day 3

Welcome to Day 3 of the Portfolio Dress Sew Along hosted by Gwenny Penny and Pickup Some Creativity!


If you are just joining us, click here for Day 1 of the sew along and here for Day 2. If you haven't already, please join our Flickr group so you can share your dress with everyone. Today you'll start here on Gwenny Penny with me to complete Steps 17 through 19, then head on over to Pickup Some Creativity for Steps 25 through 27 with Chris.

Step 17: "Apply fusible interfacing to WRONG side of sleeve band (piece 10). Stitch notched ends of band. Fold band in half lengthwise and press, setting in a crease. Open out band. To EDGE FINISH unnotched edge... stitch 1/4" from edge, turn under along stitching and stitch OR zig-zag over the edge OR overlock/serge over the edge."

You have two sleeve bands (piece 10). If your fabric is one sided, the first thing I'm about to tell you can be ignored. Just iron your interfacing onto the wrong side of your sleeve bands. My contrast fabric, however, is plain white, so it doesn't have a right or wrong side. If you're contrast fabric falls under this category, make sure you iron your interfacing onto the proper side of the sleeve bands. You need to make sure that the notch along the long edge of the sleeve band is to the right on one piece and to the left on the other when you iron on your interfacing. Here's a picture to show you what I mean...


Take one sleeve band and pin the short edges right sides together, lining up the notches.


Stitch along this edge using a 5/8" seam allowance.


Press the seam open. Fold the band in half lengthwise with wrong sides together, and press to form a crease.


Open the band up. You now need to finish the unnotched edge. Start by stitching around the band 1/4" from the unnotched edge. Next, fold the fabric toward the wrong side (toward the interfacing) along the stitching you just sewed.


You can then finish the edge like you would a seam (see Chris's seam finishing tips from Day 2). I just stitched around the band again, but you could use a zig-zag stitch, an overlock stitch, or a serger.


This is what you should have now...


Step 18: "With RIGHT sides together, pin band (piece 10) to lower edge of sleeve (piece 9), matching seams. Stitch. Trim seam. Press seam toward band (piece 10)."

Turn your dress wrong side out. Turn your opened up sleeve band right side out. Slide the sleeve band (finished edge first) into the sleeve opening of your dress. Make sure the sleeve band seam and notch match up with the sleeve opening seam and notch. If not, switch to the other sleeve opening on your dress. Pin all the way around, matching up the seams and notches and aligning the raw edges of the sleeve and band.


Stitch all the way around using a 5/8" seam allowance.


Trim the seam down to about 1/4".  Reach inside and pull the sleeve band out. Press the seam toward the sleeve band.


Step 19: "With WRONG sides together, fold band (piece 10) along crease. On INSIDE, pin finished edge of band (piece 10) over seam, placing pins on OUTSIDE. Finished edge extends beyond seam. On OUTSIDE, stitch in the ditch or groove of seam, removing pins as you come to them."

I found the instructions for this step to be a little confusing. After reading through it about twenty times, this is how I did it... Turn your dress right side out. Fold your sleeve band (wrong sides together) along the crease that you created in Step 17. This will tuck the finished edge of the sleeve band inside the sleeve. This part of the creased band is wider than the other part and will cover the seam inside the sleeve. Pin this finished edge of the band in place from the outside (right side) of the dress.


Now you are going to "stitch in the ditch". You are going to sew right where the contrast fabric of the sleeve band meets the main fabric of the sleeve. This will catch the finished edge of the sleeve band on the inside of the sleeve.


Go slowly and carefully. You want the stitches to be nearly invisible. Once you stitch all the way around the sleeve band, it will look something like this...


You can hardly see the stitches. Now you have one sleeve band attached...


Repeat Steps 17 through 19 for the other sleeve band. Should be a piece of cake the second time around :)

Now head on over to Pickup Some Creativity for Steps 25 through 27 with Chris. Time to make some button loops!

Come back tomorrow for Steps 24 and 28 through 31 on Pickup Some Creativity and Steps 32 and 33 here on Gwenny Penny. Again, if you have any questions, tips, or comments, please leave them in the comments section below so that everyone can benefit from the discussion. Thanks for sewing along!
Tuesday, April 26, 2011

Portfolio Dress Sew Along: Day 2

Welcome to Day 2 of the Portfolio Dress Sew Along hosted by Gwenny Penny and Pickup Some Creativity!


If you are just joining us, click here for Day 1 of the sew along. By the end of today you will see some major progress on your dress. Don't forget to join our Flickr group so you can share your dress with everyone. To start off today, head on over to Pickup Some Creativity for Steps 6 through 10 with Chris. Then come back over here to Gwenny Penny for Steps 13 through 16.

Step 13: “Stitch center back (piece 5) seam from lower edge to large dot. Backstitch at dot to reinforce seam. To hem back opening edges above large dot, press under 5/8" on raw edge. To form narrow hem, tuck under raw edge to meet crease. Press. Stitch hem in place, squaring stitching at large dot. Finish seam.

Take both of your back pieces of fabric (piece 5) and pin them right sides together, matching up notches.


Sew from the bottom edge all the way up to the large dot using a 5/8" seam allowance. Make sure you backstitch at the large dot.


Now you need to hem the raw edges above the large dot.


Fold these raw edges under 5/8" toward the wrong side of the fabric. Press.


Take the raw edges and tuck them under to the crease that you just pressed. Press again.


Stitch around this newly formed hem about 1/8" from the edges, squaring off across the bottom at the large dot. I stitched over the large dot a couple of times to reinforce it.


Below the large dot, press the seam open. Finish the seam using your preferred method (see Chris’s post today for more information on finishing seams).

Step 14: “Stitch front (piece 3) to back (piece 5) at shoulder seams. Finish seams.

Take your front piece (piece 3) and your back piece (piece 5) and pin them right sides together, matching up notches. Sew along both the right and left shoulder seams using a 5/8" seam allowance.


Finish the seams using your preferred method (see Chris’s post on finishing seams for more information).

Step 15: “With RIGHT sides together, pin sleeve (piece 9) to armhole edge of front and back (pieces 3 and 5), matching notches and placing small dot at shoulder seam. Stitch. Press seam toward sleeve. Finish seams.

This process is a little counterintuitive, and people sometimes have trouble lining up sleeves and necklines because the pieces don’t follow the same curve when you pin them together. Start by opening up your dress front/back. Lay it down right side up and sideways so that the armhole is facing you.


There is one notch in the armhole area. This will help you determine which sleeve (piece 9) to use on this side of your dress. Take one sleeve (piece 9) and lay it out wrong side up on top of the armhole. The small dot on the sleeve should be at the bottom. If the notch on the sleeve is on the same side as the notch on the armhole, you have the correct sleeve. If the notches are on opposite sides, switch to the other sleeve piece 9.

Line up the edge of the sleeve piece that is closest to the small dot with the raw edge of the armhole. Make sure that the small dot on the sleeve piece is sitting directly on the shoulder seam of the armhole. Pin the two pieces together right at the dot/seam.


Now, begin to ease the fabric around to the right side of the pin, pinning every inch to inch and a half, lining up the sleeve with the raw edge of the armhole. Do the same thing around to the left side of the pin. It may not look like it before you pin it, but the two pieces will fit together perfectly. Don’t be afraid to use lots of pins! It’s really important for this part, so take the time to do it.


Carefully stitch around using a 5/8" seam allowance. Go slowly and pay attention so that the rest of your dress fabric doesn’t get caught up in your seam (I speak from experience). Press the seam toward the sleeve.

Finish the seam using your preferred method (see Chris’s post on finishing seams for more information). Repeat Step 15 for the other armhole/sleeve.

Step 16: “Stitch front (piece 3) to back (piece 5) at entire underarm seam, matching armhole seams. Finish seams.

With your dress wrong side out (right sides together), align your armhole seams and pin together. Pin the rest of the underarm area together, matching up notches.


Sew the entire underarm area from the end of the sleeve to the bottom of the dress using a 5/8" seam allowance. Finish the seam using your preferred method (see Chris’s post on finishing seams for more information). Repeat Step 16 for the other underarm seam.

You have an actual dress now! Soon you will add a neck band, sleeve bands, and a few finishing details. Come back tomorrow for Steps 17 though 19 here on Gwenny Penny and Steps 25 through 27 with Chris over on Pickup Some Creativity. Again, if you have any questions, tips, or comments, please leave them in the comments section below so that everyone can benefit from the discussion. Thanks for sewing along!
Related Posts with Thumbnails