Showing posts with label autumn. Show all posts

Friday, September 28, 2012

Point of View and Orange Link Party

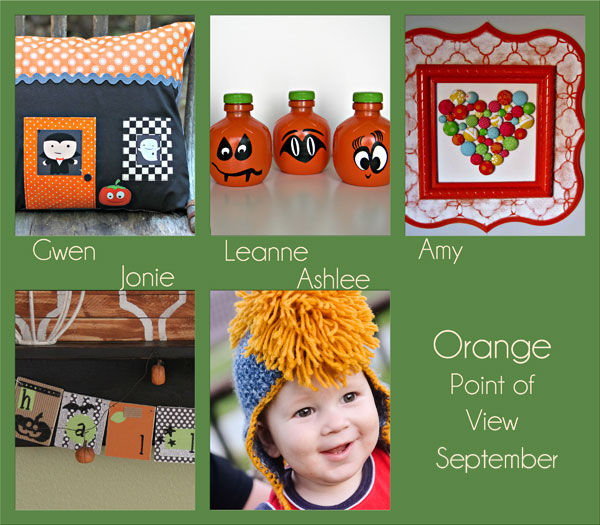
Welcome to this month's Point of View reveal! The theme for September is "Orange". Here are the "orange" ideas the members of Point of View came up with this month...

POV-September-2012

Gwen from Gwenny Penny (Click HERE to read more about my Haunted House Halloween Pillow)
Leanne from Organize and Decorate Everything
Ashlee from I'm Topsy Turvy

As always, you can check out each of the projects by visiting each of the blogs listed above.

My project this month is a pillow (For the second month is a row. Don't worry... I have no intention of trying to steal Amy's "Pillow Queen" title ;) I saw these super cute house zipper pouches by A.casa.do.Guaxinim on Flickr and thought that it would make a great pillow design. Add Dracula and a little ghost peeking out the windows and you get a little haunted house pillow for Halloween...


Click HERE to read more about my pillow.

Now it's your turn. Do you have an orange-themed/Halloween project that you would like to share? We would like to invite you to join the Point of View "Orange" Link Party! It doesn't have to be a new project... If you have a project in your archives, link it up! We want to see what you've created. You can link up to the Point of View link party on any member's blog and your link will show up in the party on all five blogs! Add the Point of View button to your post so that others can join the party. And remember, by linking up you have the chance to be featured by one of the members of Point of View next week!

Gwenny Penny - Point of View
<div align="center"><a href="http://www.gwennypenny.com" title="Gwenny Penny - Point of View"><img src="http://i953.photobucket.com/albums/ae14/gwennypennyblog/SummerPoVButtonB-1.jpg" alt="Gwenny Penny - Point of View" style="border:none;" /></a></div>


Haunted House Halloween Pillow

I've been trying to bump up the handmade Halloween decor around our house over the past couple of years (like this pillow and this embroidery hoop I made last year). When I started thinking about what to make this year, I remembered these adorable house zipper pouches by A.casa.do.Guaxinim that I had found on Flickr quite some time ago. I decided that this design would make a cute haunted house. I really didn't want to make a haunted house zipper pouch (because I wasn't sure what you'd carry in a Halloween-themed pouch), but a haunted house pillow would be perfect!


Let me add here that - thanks to my two and a half year old - I didn't get out of making a cute little non-Halloween house zipper pouch. I'll share that soon :)

The pillow is 12"x16". I absolutely love the Halloween fabric I used (Dracula, ghost, and pumpkin). It's Boo to You by My Mind's Eye for Riley Blake Designs. I've been hoarding it for two years. The little Dracula in the door window is my favorite character from the Boo to You print...


The little ghost had to make an appearance as well. I've said it before, but I can't stand the gross-out, gory, creepy side of Halloween. I'll take cutesy Halloween any day, thank you :)


The tree trunk is a birch tree print fabric I've had kicking around forever...


The back is solid grey, and I used a decorative stitch to hem the envelope closure.


I really wanted grey ric rac for this project, but I couldn't find any at Jo-Anns, and I didn't have time to order any, so I ended up mixing some black and white fabric paint and painting my white ric rac grey. It actually worked really well, so if you're in need of a specific color of ric rac, and you can't find it, try painting your own. I'm sure dying it would be the smarter thing to do, but I couldn't find any Rit dye for the life of me. I swear I used to see it everywhere, but it seems to have disappeared around here.


Anyway... fun pillow. It looks great with my Halloween pillow that I made last year. And did I mention that this month's Point of View theme is "Orange"? I added to our handmade Halloween decor and knocked out a Point of View project in one shot. Woohoo! The girls have decided that they are both going to be the same thing for Halloween this year, so getting costumes put together is the next order of business around here. I got out of making costumes last year... no such luck this year :)

Now it's your turn... Check out this month's Point of View collage and link up your past or present orange/Halloween-themed projects at the Point of View Link Party! We want to see what you've been up to!

Friday, October 28, 2011

Point of View: Burlap

Welcome to this month's Point of View reveal! The theme for October is "burlap". This is the first time that I have ever made anything using burlap. Luckily I had a remnant of it sitting in my stash, just in case I ever needed some :) Take a look at the great ideas the members of Point of View have come up with this month...


Leanne from Organize and Decorate Everything
Camilla from Rosy Red Buttons
Gwen from Gwenny Penny (Click HERE to find the tutorial for my Embroidery Hoop Turkey) 
Angie from The Country Chic Cottage (Our guest this month... Thanks for joining us, Angie!)
Michelle from A Little Tipsy

As always, you can check out each of the tutorials by visiting each of the blogs listed above.

My project this month is this cute Thanksgiving decoration...


I love this chubby little guy! This is an easy, no-sew project. Want to make your own for Thanksgiving? Click HERE for the how-to.

Now it's your turn. Do you have a burlap project that you would like to share? We would like to invite you to join the Point of View Burlap Link Party over at A Little Tipsy. Any project that includes burlap is welcome at the link party. It doesn't have to be a new project... If you have something in your archives that's made with burlap, link it up! We want to see any and all burlap ideas. And remember, by linking up you have the chance to be featured by one of the members of Point of View next week! Hope to see you there!

Embroidery Hoop Turkey Tutorial

I know we haven't even gotten through Halloween yet, but I'm moving on to Thanksgiving :) I saw Betz White's embroidery hoop snowman on Pinterest, and that got me thinking about what other wall decorations I could make with embroidery hoops. I decided that a Thanksgiving turkey might be possible. Since "burlap" is this month's Point of View theme, I thought this might be a good project to put together this month. So... here is my project for the October Point of View reveal...


This turned out better than I ever imagined it would. Isn't he adorable?!?  This is an unbelievably quick and easy project, too. There is no sewing involved. All you need is a glue gun. Want to make this cutie for Thanksgiving?


Here's the how-to...

Materials:

  • 4" and 7" embroidery hoops
  • burlap, 7" square and 10" square
  • felt (Scraps will do for the face and feet. You'll need larger pieces for the feathers.)
  • cardboard (I used a Cheez-It box from the recycle bin.)
  • glue gun
  • scissors
Instructions:

Step 1: Print out these templates at 100% (no scaling, do not "fit to page")...


Step 2: Stretch your burlap inside of your embroidery hoops.


Trim the burlap to 3/4" from the edges of the back of the embroidery hoops. Use your glue gun to glue the edges of the burlap to the inside of the back of the hoops.


Step 3: Take your two embroidery hoops and place the smaller hoop over the top portion of the larger hoop, making sure that the screw on the smaller hoop is at about 5 o'clock. The felt snood will cover the screw. Use your glue gun to glue the two embroidery hoops together like so...


Step 4: Using the templates from Step 1, cut out the beak (yellow), snood (red), two eyes (black or dark brown), and two feet (brown) from your felt.

The red piece is called the "snood". Ignore the feet in this picture... I ended up cutting the legs shorter.
Use your glue gun to glue your felt face pieces to the small embroidery hoop, covering the screw on the smaller hoop with the red snood.


Flip your hoops over and glue the feet onto the back of the large embroidery hoop.


Step 5: Cut out your felt feathers using the large feather template from Step 1. You need five feathers. I used green, yellow, purple, red, and orange felt. Cut out 5 cardboard feathers using the smaller feather template.


Use your glue gun to glue one cardboard feather to the back of each felt feather. This will add stability to the feathers so that they won't flop over when your turkey is hanging up.


Step 6: Fan out your feathers to your liking. Set your turkey body on top to make sure you like the look of it and that it fits. Remove the turkey body. Starting with the bottom layer of feathers, begin gluing the feathers to each other everywhere that they overlap until all five are firmly attached together.


Glue the back of the large embroidery hoop of your turkey body to the feather assembly. You're done!


* In order to hang my turkey, I glued a paper clip to the back of the center feather at the very top of the cardboard. Also, I was a little concerned about how stable the turkey would be using my glue gun to put it together, but I was pleasantly surprised by how sturdy it feels.*

Doesn't he look similar to my Thanksgiving place card printable that I designed last year?


I'm still thinking of other embroidery hoop ideas. A Santa Claus or a reindeer might be next!

Now it's your turn... Check out this month's Point of View collage and link up your past or present burlap-themed projects at the Point of View Burlap Link Party!


I'm linking up...

monogramDesigner Garden


Friday, September 30, 2011

Printables of Autumn Past

I thought I'd repost my autumn printables from last year since I had just started this blog when I first created and posted them. These are great for scrapbooking, parties, craft projects, gift tags, little notes, etc. The graphics on all of my printables are original, created by me. Printables are for personal use only please. Thanks!

First up are my Autumn Recipe Cards and Canning Labels/Tags...


Click HERE for the links to download these files and instructions for printing.

Next up are my "Welcome Autumn" Mini Banner and Cupcake/Muffin Toppers...


Click HERE for the links to download these files and instructions for printing.

Enjoy!


Make sure you enter for a chance to win an AccuQuilt Go! Baby. Giveaway ends Monday, October 3rd at 11:59pm (EST).

Thursday, September 29, 2011

Point of View Features and Theme for October

Thanks to everyone who linked up their autumn-themed projects at the Point of View Autumn Link Party last Friday. It was our biggest Point of View link party yet! If you haven't taken a few minutes to check out all of the great projects that were linked up, be sure to take a look.


Since my project for this month was a recipe, I thought I'd feature two of the recipes that were linked up. First up is this Pumpkin Pie Milkshake recipe from Stephanie at My Li'l Pumpkin Patch...


I'm not a big fan of pumpkin pie, but add ice cream to anything and I'll eat it :) This recipe only calls for three ingredients and doesn't even require any measuring. I love the cinnamon sprinkled on top.

Next up is this Easy Apple Crisp recipe from Heather at Our Life in a Click...


Apple crisp is my husband's favorite, so I will definitely be trying this out. Best part? The topping includes crushed graham crackers. Yum!

Stephanie and Heather, feel free to grab a Point of View feature button...


The Point of View theme for October is... BURLAP! This one is going to be interesting :) Point of View is all about your interpretation of the theme... it's all up to you! We can't wait to see what you come up with. The next reveal and link party will be Friday, October 28th. Hope to see you there!


If you haven't entered yet, make sure you check out the AccuQuilt GO! Baby giveaway!

Friday, September 23, 2011

Point of View and Autumn Link Party!

Welcome to this month's Point of View reveal! The theme for September is "autumn"... my favorite season of the year. I love the way these projects look when you bring them all together. Take a look...


Jonie from Just Between Friends
Gwen from Gwenny Penny (Click HERE to find the recipe for my Autumn Paintbrush Cookies)
Stephanie from Always Just a Mom (Our guest this month... Thanks for joining us, Stephanie!)
Amy from Ameroonie Designs
Camilla from Rosy Red Buttons
Michelle from A Little Tipsy

This month is chock full of great ideas. I'm continually amazed at the diversity of the projects month after month. As always, you can check out each of the tutorials by visiting each of the blogs listed above.

My project this month is actually a recipe: Autumn Paintbrush Cookies...


These are sugar cookies that you decorate with an egg yolk paint before baking. I am a sugar cookie connoisseur. I've been eating these my entire life, and I'm telling you... they are the best. Click HERE to find out how to make my favorite cookie of all time.

Now it's your turn. Do you have an autumn-themed project that you would like to share? We would like to invite you to join the Point of View Autumn Link Party right here on Gwenny Penny! Any idea that you feel relates to the theme is welcome at the link party (autumn, fall, harvest, Halloween, Thanksgiving, etc). It doesn't have to be a new project... If you have something in your archives that's autumn-related, link it up! We want to see any and all autumn ideas. Add the Point of View button to your post so that others can join the party. And remember, by linking up you have the chance to be featured by one of the members of Point of View next week!

Point of View: A Creative Collaboration,a creative collaboration,point of view,point of view a creative collaboration

Related Posts with Thumbnails