Showing posts with label refashion. Show all posts

Monday, July 11, 2011

Shirt Sleeve Bag Tutorial

I guest posted on My Own Road with this tutorial a few weeks ago as part of Jen's Button Down Rehab series. I asked my husband for a shirt, but he reminded me that he had just donated a whole bunch of shirts to the Salvation Army, so I had to make a trip to Goodwill, where I found an awesome orange plaid men's extra-large short sleeve button down shirt. It looked so summery that I couldn't pass it up. At this point, I still didn't know what I was going to do with it, though. I spent days thinking about it and finally decided that I wanted to make a bag, but it wasn't until I actually started cutting the shirt apart that I came up with the idea for The Shirt Sleeve Bag...


Cute huh? All I did was cut the sleeves off the shirt, open them up along the underarm seam line, and sew them together with a lining. Simple as that. Want to see how it's done? I thought so...

Materials:
  • short sleeve men's extra-large button down shirt
  • lining fabric - about 1/2 yd, depending on the size of your sleeves (You could use the back of the shirt, but I used a contrasting fabric to make the tutorial pictures easier to understand.)
  • fusible fleece - about 3/4 yd, depending on the size of your sleeves
  • wooden bag handles (I used 6" bamboo D-shaped handles)
  • coordinating thread
  • rotary cutter or scissors

Instructions:

Step 1: Cut the sleeves off of your shirt right along the seam.


Open your sleeves up flat by cutting each sleeve open along the underarm seam. Cut off any serged edges along these open seams.


Step 2: Using your shirt sleeves as templates, cut out two pieces of lining fabric, one for each sleeve.


Step 3: Using your shirt sleeves and lining pieces as templates, cut out 4 pieces of fusible fleece, one for each sleeve and each lining piece. You do not need fleece along the "flange" that sticks up along the top of each piece (the actual sleeve hem)... see the picture below.


Following the manufacturer's instructions, apply the fusible fleece to the wrong side of each sleeve and lining piece.

Step 4: Take one sleeve and one lining piece and line them up with right sides together. Using a 1/4" seam allowance, sew along the top ("flange"). Press the seam open. Repeat with the other sleeve and lining piece. You will end up with two of these...


Step 5: Take your sleeve/lining pieces from Step 4 and place them right sides together, matching the sleeves together and the lining pieces together. Pin all the way around. You are going to leave three different openings when you sew your bag together. The first opening will be along the bottom of the lining so that you can turn your bag right side out. Leave about a 4" opening. The other two openings will be along the side seams where the sleeve meets the lining. These openings should be 4" long each and be centered where the sleeve meets the lining. Make sure to backstitch at every spot where you begin and stop sewing.


Sew all the way around using a 3/8" seam allowance, leaving openings as indicated above.

Step 6: Clip the corners and turn the bag right side out through the hole in the bottom of the lining. Press, tucking in the raw edges of the opening in the bottom of the lining. Sew the opening shut close to the edge.


Tuck the lining inside the bag and press.


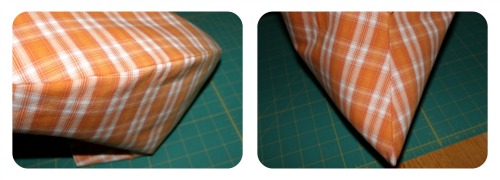
This is what you should have so far...


And let's take a moment to check out how well the plaid lines up along the bottom and the side...
That was pure luck. I totally did that on purpose.

Step 7: Now to tidy up the other two openings that you left in Step 5 and create a casing for the handles. This is the tricky part. Take your raw edges along one opening and tuck them in. Pin in place. Repeat for the other opening on the opposite end of the bag.


To close up the opening, you are going to sew up one end until you get to the existing shirt sleeve hem, then sew along the existing shirt sleeve hem, then down the opposite end of the bag. Hopefully this picture makes it clear...


Repeat along the other side of the bag.

Step 8:  My bamboo handles were one piece, so if you buy handles with a removable rod across the bottom, you can skip this step. I needed to create an opening along the bottom of my handle in order to insert it into the casing. A little investigation showed me that the handles were just glued at one point along the bottom. I gently cracked the glue, only to find that there was a metal rod joining the two ends of the bamboo together. With a little gentle pulling I was able to pull one end of the metal rod out so that I could slip my handle into the casing of the bag.


After inserting the handle through the casing in the bag, just slip the metal rod back into the hole on the other end of the bamboo. Repeat for the other handle.

Congratulations! You just made a cute bag out of shirt sleeves!


I'm linking up...

sew many waysTodays Creative Blog

Tuesday, June 28, 2011

Shirt Sleeve Bag

I'm guest posting over at My Own Road today as part of Jen's Button Down Rehab, a two-week series sharing some great tutorials from several different bloggers who will be creating new things out of old button down shirts. Today I'm sharing a bag made from shirt sleeves!


Cute, huh? Head on over to My Own Road for the full tutorial.

My Own Road Button Down Rehab

Wednesday, March 23, 2011

Pieced Jersey Dress

I bookmark at least 10 projects a week that I see on other blogs that I would love to try. Since all those items on my to-do list aren't going to make themselves, I'm doing something new on my blog. I'm taking the time once a week to make something that someone else has come up with that I really love. Plus, sometimes it's just nice to enjoy making something without having to take process pictures and write a tutorial, you know? Two weeks ago I made the Birthday Countdown Frame, and last week I made the Turtleneck to Zipped Pullover Refashion. This week it's the Pieced Jersey Dress from kojodesigns.

I happened to run into Walmart yesterday and stopped by the baby girl clothes to see if there were any good t-shirts on clearance. I hit the jackpot. As soon as I got home and got my youngest down for a nap, I got to work. This is what I ended up with...


So cute! The kojo tutorial is for making a onesie into a dress, but I just used a tank top. I purchased the pink tank top in my daughter's normal size (18 months) and three toddler t-shirts, one each in sizes 2T, 3T, and 4T, for $1 each.


I love the exposed seams and not having to hem anything. Knits and I are warming up to one another. I kind of, sort of like them :) I banged this out in one naptime (about an hour).


So my t-shirts went from this...


To this...


This dress will be perfect for the summer, but I'll be able to get away with putting her in it with a shirt under it this spring. Love how quick, easy, and cute this project was. I even have enough of the t-shirts left over to make a dress for my new niece that will be arriving in June.

Wanna make your own? Click here to see the Pieced Jersey Dress tutorial over at kojodesigns and here to see three more variations of the same adorable dress.

I also want to remind you that the first ever Point of View projects will be revealed on Friday! This month's theme was skirts, and I will be posting a new tutorial for a little girl's skirt and showing you all of the skirt projects that were created by the other members of the project team. And don't forget that you can link up any skirt projects you have done (past or present) at the Point of View link party on Friday. Hope to see you there!


I'm linking up...

Show and Tell Green

Wednesday, March 16, 2011

Turtleneck to Zipped Pullover Refashion

Did you guys happen to catch Cheri's T-Shirt to Zipped Pullover tutorial over at I Am Momma Hear Me Roar?  It was a guest post during Dana and Rae's Celebrate the Boy series. Even though I have two girls, I absolutely loved it and wanted to try it out for my oldest daughter. I had a heck of a time finding a long sleeve t-shirt in the right size... wrong time of year, I guess. I ended up finding a boy's plain dark gray turtleneck on clearance at Walmart for $1, and that's what I refashioned into this...


How cute is that? See that awesome pleat at the bottom of the zipper? I totally messed that up. meant to do that.

I had a flannel Hello Kitty remnant that I picked up at Jo-Ann's, and I knew I wanted to use part of it for this shirt. The inside of the pocket is just plain cream colored flannel. Add a little raspberry ribbed knit and a blue-gray zipper, and you've got a pretty cute little shirt.


This was my first sewing refashion, and I have to admit that I was a little frightened to start cutting into that perfectly good turtleneck until I reminded myself that it was only a dollar... Then I got over it pretty quickly.

I fear knits, but this was so simple and actually a pretty quick project. And that's coming from a super slow sewer. In no time at all that gray turtleneck went from this...


To this...


Wanna make your own? Click here to see the T-Shirt to Zipped Pullover tutorial that Cheri posted over at I Am Momma and to see her adorable refashion.


I'm linking up...
giveawaysGet Your Craft On TuesdayA Crafty Soiree
Related Posts with Thumbnails